Angular

Did a user click a button?

While working on a project I came across a situation where I needed to know if a button was clicked by a user or if it had been triggered by the code.

Lucky for us, the DOM is pretty friendly to us in this instance and offers us some help - the isTrusted property from the Event interface.

Let’s create a simple Ionic app and add in some HTML and Typescript to try it out.

<ion-content>
  <ion-item text-center>
    <ion-label class="ion-text-center">{{ source }}</ion-label>
  </ion-item>

  <br />

  <ion-button id="button" expand="block">
    User click click
  </ion-button>

  <ion-button (click)="onRobotClick()" expand="block">
    Robot click
  </ion-button>
</ion-content>

We have a simple label which will hold the source of our clicks and two buttons.

Let’s now add some typescript code to handle all the different clicks.

export class HomePage implements OnInit {
  source: string;
  constructor() {}
  
  ngOnInit(): void {
    document
      .getElementById('button')
      .addEventListener('click', (event: Event) => {
        this.setSource(event.isTrusted)
      })
  }

  onRobotClick() {
    document.getElementById('button').click();
  }

  setSource(isTrusted: boolean) {
    this.source = isTrusted ? 'User' : 'Robot'
  }
}

We will add an eventListener on our first button and then monitor what happens with him.

Clicking the button itself will trigger a regular event which we will handle with the event listener and check for the isTrusted property which should be set to true.

If we click the second button we will executed a different function which will grab the element by its id and execute a click which should result in the isTrusted being set to false.

In both cases we will call the setSource function which will get the property and display if a user or robot clicked on the button.

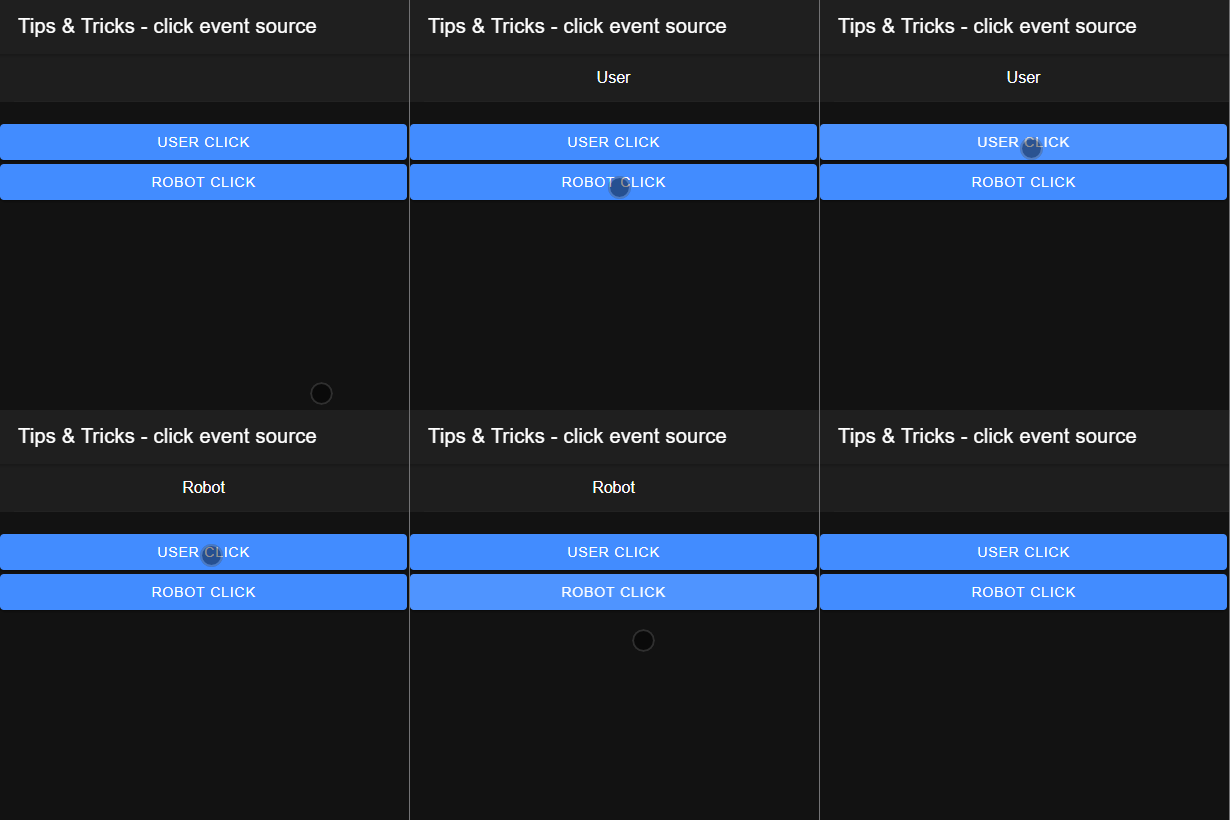
click-gif.gif

As you can see above, clicking the button directly results in the isTrusted property being true so the app displays, correctly, that a user clicked on the button. Clicking the other button triggers a programmatical click on the HTML element which results in the property being false which is indicated by the label changing to Robot.

As always, you can get the code from github.

That’s it for today.

Until next time,
Happy coding

Regex in a switch statement

While working for a client I recently came across an interesting problem. The routing architecture was designed in a particular way which prevented users from directly accessing a page by using a specific URL to the resource. Users had to click their way through the app to get to a specific user or location.

A square peg and a round hole

This proved to be a challenge when a new requirement came up to allow administrators to send links to managers for individual locations.

The links were in the form of http://foo.bar/location/[locationId]/manage

We were able to generate these links directly but the infrastructure to navigate to them didn’t exist and since the entire code base is going to be rewritten with only the necessary modules first, there wasn’t really an incentive to redo the entire routing architecture.

Trying to square the round hole

The approach taken was to create an http interceptor for the app and only trigger the direct navigation mechanism for very specific URLs.

The first draft of the app had a bunch of if statements which would perform Regex evaluations for each of the specified URLs and return a result only on matches. It worked well enough to fix the problem but we didn’t really liked the way it looked. It looked a little clumsy so we tried cleaning it up a bit and ended with a nicer solution.

The solution

Instead of using if statements we wrapped everything up in a switch statement.

getRedirectPage(part: string) {
   switch (true){
       case /location\/\d+\/manage/.test(part): 
           return 'LocationManagePage';
       case /user\/\d+\/profile/.test(part): 
           return 'UserProfilePage';
       default:
           return '';            
   }
}

The return value of the .test() function is of type boolean and only one of the expressions will (or should) return true and match the control value passed to the switch statement which in turn executes a specific block of code which returns the correct page to navigate to.

More often than not, this will be just syntactic sugar, even though switch statements can be more optimized than if statements (link), in our case the performance will pretty much be identical.

Next time we will look into one big performance issue in Angular and Ionic applications - having function calls inside the HTML template and discuss some solutions to this problem.

Until then,
Happy coding

Simple multi level menu in Ionic/Angular

While working on a project, a new requirement emerged where the client wanted to have a multi level menu displayed. After some digging around I didn’t find anything that was simple enough. Pretty much all of them were using some kind of id + level tags on menu items which then helped them know if they should expand something or not.

I like to keep things as simple as possible so I tried to take advantage of Angular’s component system and build something a little easier to understand.

Hello world (kind of)

Let’s first create an Ionic app with a predefined side menu and move from there. You just need to run this command in your terminal and Ionic will do the rest.

> ionic start multilevel-menu sidemenu

Now you can start your app with the following command

> ionic serve

This will start your (default) browser and you should see something like this:

What we start with

What we start with

Looks nice, but nothing too exciting.

1. Housekeeping

Before we start, let’s remove a bunch of things before we start. Let’s remove everything referencing list. Remove the entire list folder as well as all of it’s traces from the app.components.ts and app-routing.module.ts files. If you rerun ionic serve now, you will see just a single home menu item.

2. Creating a model

What better thing to have as a model for our multi level menu than a restaurant menu. Unfortunately, restaurant menus can get quite complicated but it will serve our needs perfectly.

We will create a very simple model with just three properties: name, id, and children. Create a new folder inside the app folder and name it models. Add another file, named menu-item.ts into it.

//src/app/models/menu-item.ts

export class MenuItem {
  name: string;
  id: number;
  children: Array<MenuItem>;
}

3. Creating some data

Based on this model, let’s creating some data for our app to use. We will create another folder named data inside the assets folder and add a new menu-items.ts file into it with the following content

//src/assets/data/menu-items.ts

export const menuItems = [
  {
    name: 'Appetizers',
    id: 1,
    children: [
      {
        name: 'Fresco Salsa',
        id: 6,
        children: null
      }
    ]
  },
  {
    name: 'Main dishes',
    id: 2,
    children: [
      {
        name: 'Beef',
        id: 7,
        children: [
          {
            name: 'Crispy Orange Beef',
            id: 10,
            children: null
          }
        ]
      },
      {
        name: 'Burger',
        id: 8,
        children: [
          {
            name: 'Chorizo Burger',
            id: 11,
            children: null
          }
        ]
      },
      {
        name: 'Vegetarian',
        id: 9,
        children: [
          {
            name: 'Chile Rellenos',
            id: 12,
            children: null
          }
        ]
      }
    ]
  },
  {
    name: 'Side dishes',
    id: 3,
    children: [
      {
        name: 'Baked potato',
        id: 13,
        children: null
      }
    ]
  },
  {
    name: 'Salads',
    id: 4,
    children: [
      {
        name: 'Taco Slaw',
        id: 14,
        children: null
      }
    ]
  },
  {
    name: 'Desserts',
    id: 5,
    children: [
      {
        name: 'Crepes',
        id: 15,
        children: null
      }
    ]
  }
];

It’s a mix of everything, so I hope there is something for you in this menu as well!

4. Final work before the good stuff

The last thing we have to do is go back to our app.component.ts and replace appPages with our new menuItems

//src/app/app.component.ts

import { menuItems } from '../assets/data/menu-items';

// ...

export class AppComponent {
  private menu = menuItems;
  // ...
}

The last thing we have to do is to remove the old markup used to render the menu and replace it with something simpler (for now). Let’s go into the app.component.html file and do that right now.

<!--src/app/app.component.html-->

<ion-menu-toggle auto-hide="false" *ngFor="let menuItem of menu">
  <ion-item>
    {{menuItem.name}}
  </ion-item>
</ion-menu-toggle>

Saving everything you should see your new menu in all it’s glory.

The first level of menu items

The first level of menu items

It’s pretty, isn’t it?

5. Brainstorming

Let’s think about how we are going to proceed here. From the model we can see that we have a menu item that can hold a bunch of menu items and so on.

What we will do then is to create a component which will pass its children to another component of the same type.

If the current component doesn’t have any children it’s a dish and we will display a simple button for the user to tap on, otherwise it’s just a category and we will display it differently.

6. Creating the component

If you are like me you don’t know all the bits and pieces a component needs right away. Lucky for us Ionic and Angular have us covered. Just switch to your terminal and type in the following command

> ionic g c menu-item

This will tell the Ionic (and underlying Angular) CLI to g(enerate) a new c(omponent) named menu-item.

We, also, need to let Ionic know about our new component so we will add it into the declarations array of the app.module.ts file.

//src/app/app.module.ts

import { MenuItemComponent } from './menu-item/menu-item.component';

// ...

@NgModule({
  declarations: [AppComponent, MenuItemComponent],
  
  /// ...
}

Let’s change the markup in app.component.html file to use the new component:

<!--src/app/app.component.html-->

 <ion-menu-toggle auto-hide="false" *ngFor="let menuItem of menu">
   <!-- <ion-item>
     {{menuItem.name}}
   </ion-item> -->
   <app-menu-item></app-menu-item>
 </ion-menu-toggle>

Saving it all now will result in this:

Looks like my CS degree is paying off

Looks like my CS degree is paying off

There is one last step until we can call it a day…

7. Finishing the component

As we discussed above, if the current menu item has children, we want it to display its name and pass its children down to another component of the same type. If there are no children, display a button which the user can click.

The final component will look something like this:

<!--src/app/menu-item/menu-item.component.html-->

<div>
  <p *ngIf="menuItem.children; else finalItem">
    <ion-button
      [color]="isRoot ? 'primary' : 'secondary'"
      [expand]="isRoot ? 'full' : 'block'"
      (click)="isOpen = !isOpen"
    >
      {{ menuItem.name }}
    </ion-button>

    <span *ngIf="isOpen">
      <app-menu-item
        *ngFor="let item of menuItem.children"
        [menuItem]="item"
      ></app-menu-item>
    </span>
  </p>
</div>

<ng-template #finalItem>
  <p>
    <ion-button color="light" expand="full" 
                (click)="onMenuItemSelected(menuItem)">
      {{ menuItem.name }}
    </ion-button>
  </p>
</ng-template>

The trick here is simply to toggle each component’s isOpen property and toggle between showing and hiding the children. Also, if you aren’t familiar with the if - else syntax from here, check out one of my previous posts.

Let’s just clean up the app.component.html a little and we are done

<!--src/app/app.component.html-->

<app-menu-item
  *ngFor="let menuItem of menu"
  [menuItem]="menuItem"
  [isRoot]="true">
</app-menu-item>

The final product will look like this:

Final multile level menu

Final multile level menu


If you had trouble following along, or just want to see the code fully. You can check it out here.

Until next time,
happy coding.

*ngIf in Angular with a twist

Showing and hiding content in is usually done by using the *ngIf directive:

<p *ngIf="isButtonClicked">Button is clicked!</p>

If you want to display something if the condition isn't satisfied you would probably do something like this:

<p *ngIf="isButtonClicked">Button clicked!</p>
<p *ngIf="!isButtonClicked">Button not clicked</p>

This looks a little clumsy and, also, forces you to repeat yourself. You are biding to the same property and if the name changes you will have to change it in multiple places - not a good thing to do.

A more elegant way of achieving the same thing looks can be seen below:

<p *ngIf="isButtonClicked; else buttonNotClicked">Button clicked!</p>

<ng-template #buttonNotClicked>
    <p>Button not clicked :(</p>
</ng-template>

The final result can be seen here:

ngif.gif

One added benefit is that you can handle these special cases anywhere in your file and Angular will do the rest